Learning Targets:
- Group object and explain why these objects have been grouped together
- Give reasoning as to why and when you can use layers
- Group object and explain why these objects have been grouped together
- Give reasoning as to why and when you can use layers
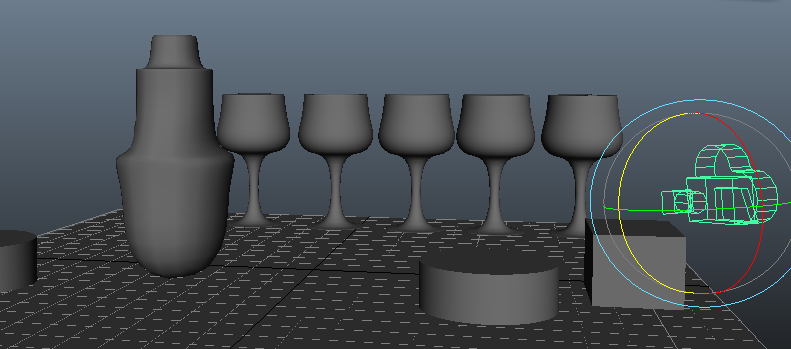
You can gt really creative building a set and have a lot of fun. A good idea to to build your set and import your animation in later
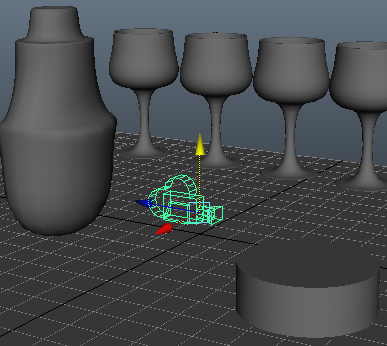
grouping objects
This is an essential skill when building sets and having multiple objects in a space. You will be able to work with more ease and faster. You may organise your groups so that all your cylinders are together or maybe all similar objects. You'll be able to edit many at the same time this way.
|
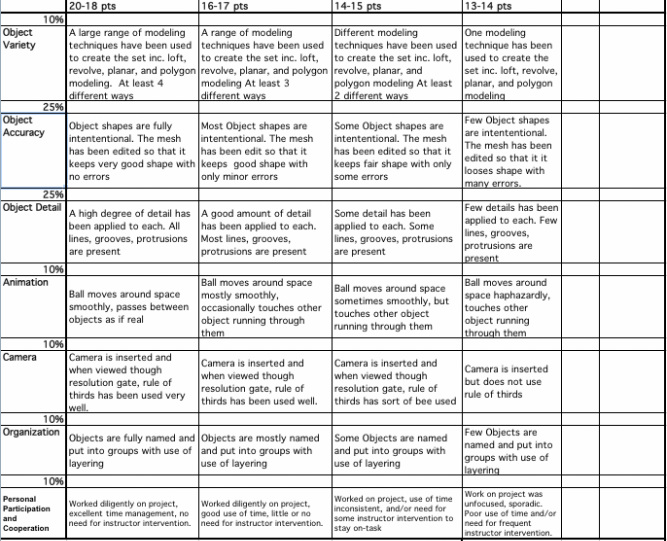
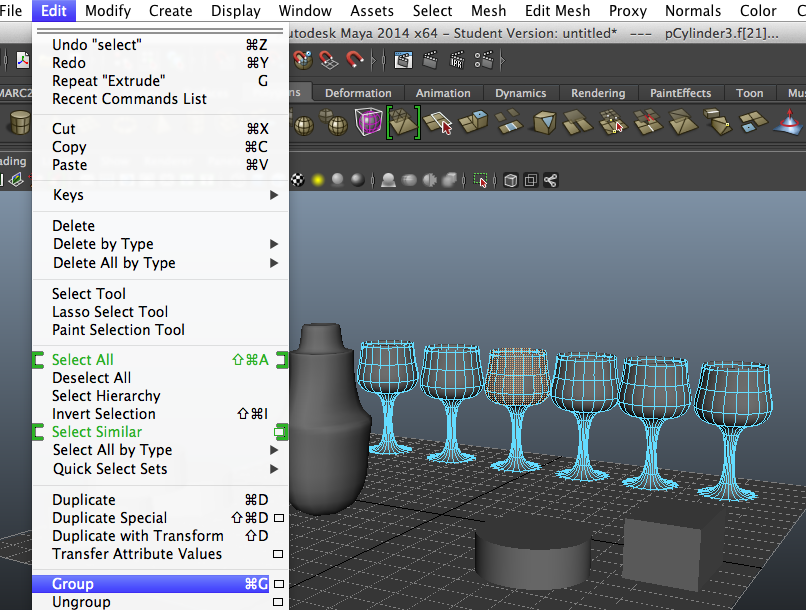
1. You'll need to make your set of object first and then select them all. Edit > Group or 'Control G'
3. You can import you set into your animation rig and then select each group to change the scale to suite the rig.
|
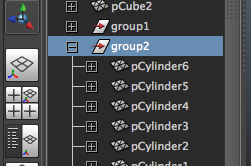
2. If you look in the display box on the left hand side you'll see you your object are placed in a folder named group 1
IMPORTANT TIP: Remember to name all your objects so you know which is which and can more more easily.
You can name the objects in the channel box |
display layers
|
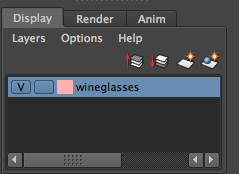
1. Just below the channel box is the display box and you'll see the layers tab.
Select all the objects you'd like to go inside a layer, perhaps that's one of your groups. Use the button on the right ... 
...to create a layer and have the select items inside automatically. Double click where the layer has been added and you should rename your layer. You can color code it too if you like
|
Now you can turn the visibility on and off. Useful because your set can quickly become full and confusing
2. IN the layer you'll see:
V - turn the visibility on and off. Empty box next to the V so that you have a T T - See the frame in your chosen color R - Will lock all object within layer so you cannot edit them 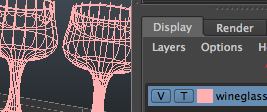
|
Cameras
Learning Targets:
- Place, move and rotate a camera around a set
- Lock a camera
- Look through a camera and demonstrate knowledge of the different types of views and why we would have these options
- Place, move and rotate a camera around a set
- Lock a camera
- Look through a camera and demonstrate knowledge of the different types of views and why we would have these options
|
1. Create > Cameras > camera to insert a camera into your set. It will appear right in the middle which you may already have an object. Use the move tool 'w' to move it.
5. To show the actual frame of the shot (what will be shown on the TV/in the final
View > options > turn on the resolution gate 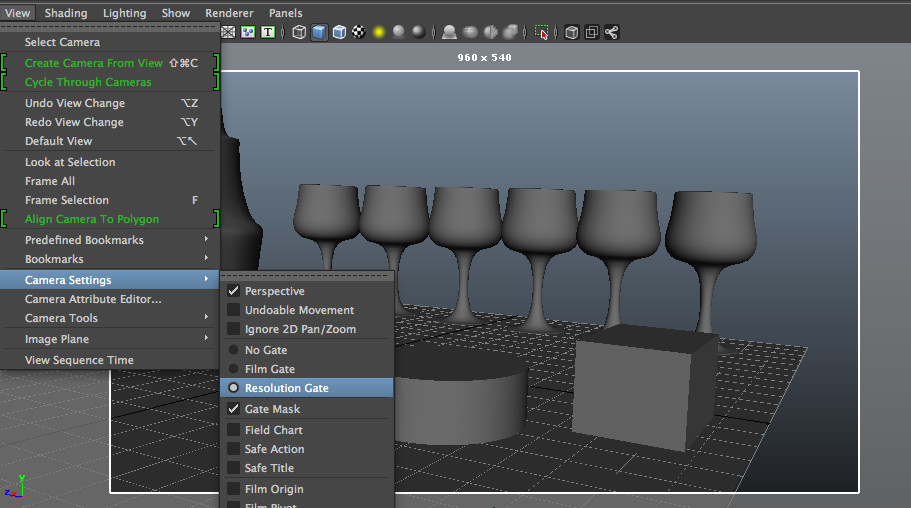
6. To stop from accidentally moving the camera about
view > select camera. Now click and drag over all the attributes in the channel box... 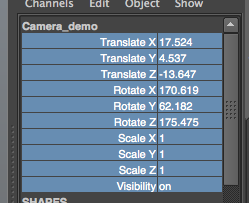
|
2. Move it to where ever you'd like to view the animation or set from as the audience. Also rotate 'e' and face it in the correct direction
3. Name the camera in channel bar an put it into a layer
4. To look through the camera Panels > look through selection. use the normal controls to move around and view the scene as you want the audience more precisely. 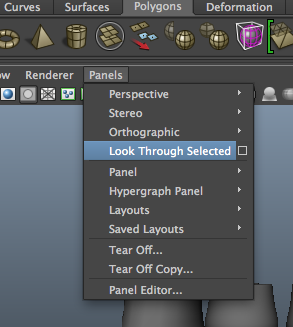
6 ....then right click > lock selection. They should now be blue. You can go back and edit by selecting again right click > unlock settings
|
Camera settings: lens
Learning Targets:
- Use examples of different focal length to discuss why they might be used.
- Use examples of different focal length to discuss why they might be used.
If you are at all familiar with photography then that can really help you here. Start playing with the type of focus.
|
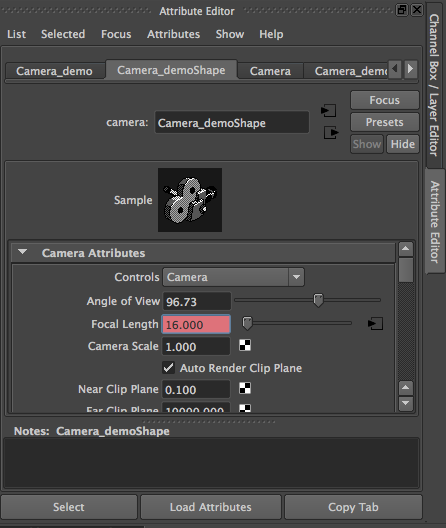
1. Go to your Attribute Editor, just below the channel box. Under the camera attributes tab you'll see the Focal Length - Here you can select the type of lens you'd use.
A telescopic lens (big zoom) uses a 200.000 Standard - 35 - What the eye usually sees Wide Angel - 16 - Much more dramatic |
|
Framing
Learning Targets: - Identifying when the rule of thirds is used
- Applying the rule of thirds to camera placement and view
- Give feedback to a peer about how else the shot could be framed
- Applying the rule of thirds to camera placement and view
- Give feedback to a peer about how else the shot could be framed
Where to put your camera? Well you don't want your objects to be right in the middle - that's boring and unprofessional!!! You want to learn to use RULE OF THIRDS, a concept used to create more dynamic photographs. <<<<<<<INSERT CROPPING PPT FROM ART 1>>>>>>>>>
So if you have your ball rolling, you don't want it to come down the center but closer to one of those cross sections
camera clipping
|
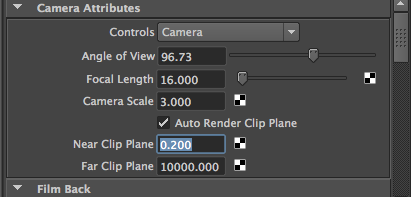
1. In the attribute editor when you have your camera selected. Change the value of 'near clip plane' to a very small value, this will help you to zoom into very small objects with the camera a lot.
2. On the flip side you can change the 'far clip plane' to a larger value, for example 100,000. The reason is because sometimes your objects may disappear when you zoom out. This will help that problem.
|
|
importing your set
Learning Target:
- Import a set into an animation scene and edit size and placement as needed
- Import a set into an animation scene and edit size and placement as needed
So you will need to start in your animated scene. File > import > select your set.

Now you can change the size of your set as showed above and finished!
MODELING EXERCISE
EXERCISE: Build a basic set for your ball rolling animation that you created in a previous session . Create a camera and use rule of thirds.
You can be as creative as you like, make what you want but you must finish in 3 lessons.
EXERCISE: Build a basic set for your ball rolling animation that you created in a previous session . Create a camera and use rule of thirds.
You can be as creative as you like, make what you want but you must finish in 3 lessons.
- Import your BASIC ANIMATION of the ball rolling into this scene, or vice versa.
- Create a .ZIP archive that contains: The Maya file named “YourFullName_Camera.ma”.
- Go to your Submit Your Work page and upload the .ZIP file to the Assignment Session section.